Blog
- Android UI Automation with FindNode: Automate UI Elements Without Fixed Coordinates
- Android Automation: How to Automate Real Android Devices from PC
- Scrcpy Multiple Devices: How to Control Multiple Android Devices on Windows
- Deploy APK to Multiple Android Devices: Batch Installation Guide
- Vysor Alternative for Windows: Control Android with Keyboard and Mouse
- Screen Mirroring Android to PC: USB and Wi-Fi Methods
- Best scrcpy Alternatives for Windows: 5 Options Compared
- Best File Transfer Software from Android to PC: Which Method Should You Use?
- How to Control Android with Keyboard and Mouse from a PC
- How to Test Mobile Apps on Multiple Devices Efficiently
- How to Manage Multiple Devices Efficiently
- Local vs Cloud Device Farm: Which Is Better
- Multi-Device Setup for Live Streaming Workflows
- How to Use an Android Device Farm Efficiently
- Android Screen Mirroring with Control: What You Need to Know
- How to Mirror Multiple Android Devices to PC
- Best Android Screen Mirroring to PC: Full Guide
- How to Control Multiple Demo Devices for Retail and Exhibitions
- How to Manage Multiple Devices for Social Media Workflows
- How to Use Multiple Devices for Content Creation
- Best Multi-Device Workflow Tools for Efficient Operations
- Mobile Device Management vs Device Control Software: What’s the Difference
- How to Control Multiple Android Devices from One PC
- Android Device Farm: How to Build and Control Multiple Android Devices
- Control Android Phone from PC | Mirror and Operate Android on Windows
Android UI Automation with FindNode: Automate UI Elements Without Fixed Coordinates
Android UI automation controls Android applications by identifying interface elements such as buttons, text fields, labels, and other UI nodes instead of depending only on fixed screen coordinates.
This approach is useful when the same automation workflow must run across Android devices with different screen sizes, resolutions, or layouts. With Total Control FindNode, an automation workflow can locate a UI element, build a query for it, and then perform actions such as clicking, entering text, reading content, or checking element properties.
This article focuses specifically on UI element-based Android automation with FindNode. For a broader overview covering scripts, APIs, multi-device control, and general real-device workflows, see the Android Automation guide.
How Android UI Automation Differs from General Android Automation
Android automation is a broad topic. It can include launching applications, installing APK files, running JavaScript, triggering operations through REST APIs, controlling multiple devices, performing coordinate-based clicks, and finding Android UI elements.
Android UI automation is narrower. Its main purpose is to identify what is currently displayed in the Android interface and interact with specific UI elements.
For example, instead of telling an automation script:
Click(500, 800)you can define a workflow such as:
Find "Login" button
↓
Click the button
The first method depends on where the button appears. The second method depends on what the UI element is. That distinction becomes important when the same application runs on several Android devices.
Why Fixed-Coordinate Android Automation Can Break
Coordinate automation uses an X/Y location on the screen. This can work well in a controlled environment where the device model, screen resolution, orientation, and application layout remain unchanged.
Problems appear when those conditions change.
Device A
1080 × 2400

Device B
720 × 1600
A button displayed near the bottom of Device A may appear at a different coordinate on Device B.
Fixed-coordinate automation can therefore be affected by:
- Different device models.
- Different screen resolutions.
- Portrait and landscape orientation.
- Application layout changes.
- UI elements moving to different screen positions.
FindNode addresses this problem by locating UI elements before executing an operation rather than assuming that the target is always at the same coordinate.
How FindNode Works for Android UI Automation
FindNode is a Total Control feature for locating Android UI elements and performing operations on them.
A basic workflow looks like this:
Android App
↓
UI Explorer
↓
Find UI Element
↓
Create Query
↓
Execute Action
The key difference is that the automation first identifies the target element.
For example, an Android application may contain a button with:
Text: Login
Class: Button
Instead of recording the button's current screen position, you can create a query describing the UI element and use that query when the automation runs.
Inspect Android UI Elements with UI Explorer
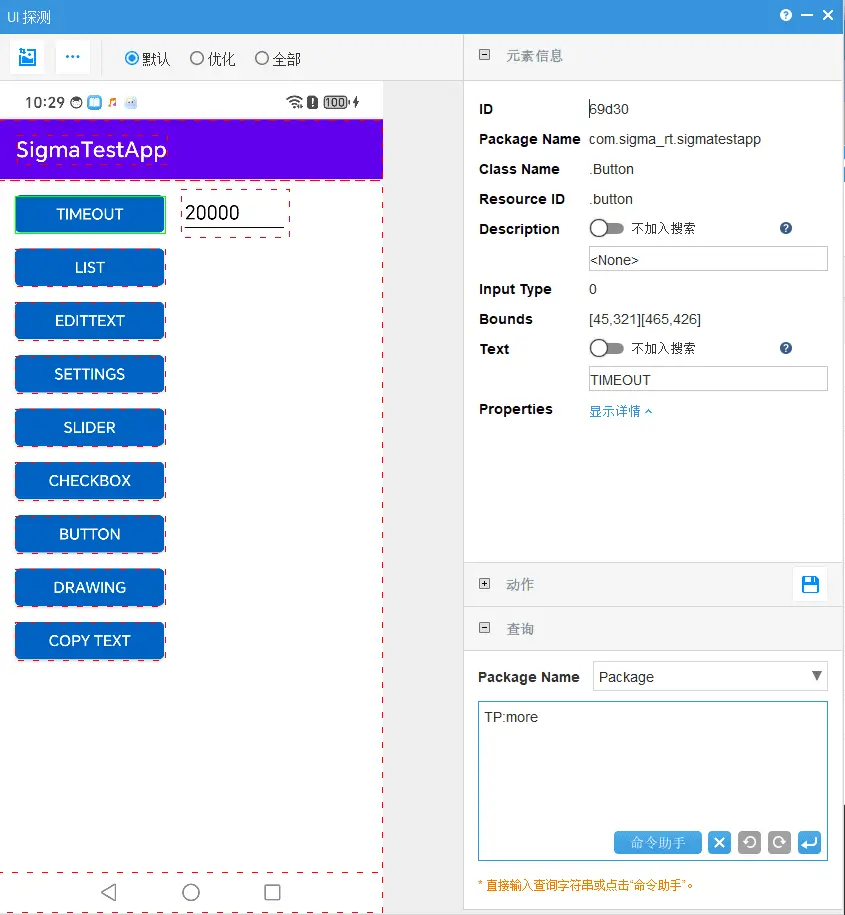
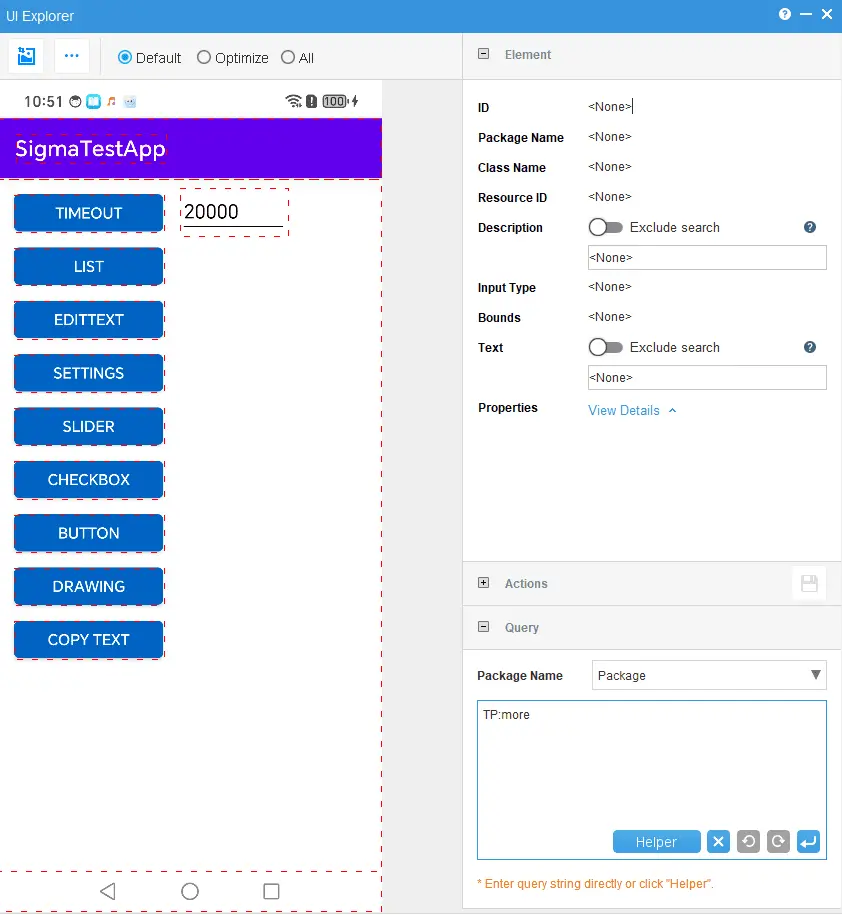
Before creating a FindNode query, you need to understand the UI elements available on the current Android screen. Total Control provides UI Explorer for this purpose.
UI Explorer can inspect an Android screen and display information associated with individual UI nodes.
| UI Property | What It Describes |
|---|---|
| Text | Text displayed by the UI element |
| Resource ID | Identifier assigned to the Android view |
| Class Name | Type of Android UI element |
| Description | Accessibility or descriptive information |
| Bounds | Position and dimensions of the element |
You do not necessarily need every property in a query. The goal is to identify enough reliable information to distinguish the target element from other elements on the screen.
How to Build a FindNode Query with UI Explorer
Step 1: Open the Target Android Screen
Navigate to the application screen containing the element you want to automate. For example, a login screen may contain a username field, password field, Login button, and Forgot Password link.
Step 2: Inspect the UI Element
Open UI Explorer and inspect the target element. For example:
Text: Login
Class Name: Button
Resource ID: login_button
The available information depends on the application.
Step 3: Create a Query
Use the element properties to construct a FindNode query. The query represents the element you want the automation to locate when it runs.
UI Properties
↓
Query
↓
Find Matching Node
You are describing the target instead of recording only its coordinates.
Step 4: Test the Query
Verify that the query returns the intended element. This step matters because a property such as Button alone may match several elements.
Step 5: Execute an Action
Once the correct UI node has been located, the automation can perform an operation on it.
Find Login Button
↓
Click
or:
Find Text Field
↓
Enter Text
Real FindNode Android UI Automation Examples
Example 1: Find and Click a Button
Suppose an application contains Login, Confirm, Submit, or Next buttons. Instead of assigning a fixed position to each button, the automation can locate the intended UI element first.
Find Button
↓
Click
Example 2: Find a Text Field and Enter Data
UI automation can locate an editable field and then enter information.
Find EditText
↓
Set Text
This is useful for:
- Login testing.
- Search workflows.
- Form automation.
- Repeated data-entry tests.
Example 3: Read Text from an Android App
FindNode does not have to perform a click. It can also be used to retrieve UI information.
Find Text
↓
Get Text
↓
Verify Result
Example 4: Verify UI Status
FindNode can be used to inspect UI properties such as whether an element is enabled, checked, or visible.
Find Node
↓
Check Properties
↓
Continue Based on Result
Example 5: Scroll Until an Element Is Found
Some UI elements are not visible immediately. For a long page or scrolling list:
Scroll
↓
Find Element
↓
Execute Action
The automation can combine scrolling with element detection rather than assuming that the target will always appear at a fixed Y coordinate.
Execute Actions After Finding a UI Element
Finding a UI node is only the first part of the workflow. After the target is identified, the automation can execute an action.
Typical operations include:
- Click.
- Get text.
- Get bounds.
- Enter text.
- Check properties.
- Perform other UI operations.
A typical model is:
Query
↓
Find Node
↓
Action
↓
Result
Android UI Automation for Testing
FindNode can also be used as part of Android UI testing.
Install APK
↓
Launch App
↓
Find UI Element
↓
Execute Test
↓
Verify Result
This pattern can be applied to:
- Regression testing.
- UI testing.
- Automated validation.
- Repeated application workflows.
- Real-device verification.
The main advantage over a purely coordinate-driven test is that the workflow can locate the intended interface element at runtime instead of assuming that the target always appears at the same X/Y position.
Combine FindNode with JavaScript Automation
A single FindNode action may be enough for a small task. More complex workflows usually require several operations to be connected together.
Total Control can combine FindNode with JavaScript-based automation.
JavaScript
↓
FindNode Query
↓
Action
↓
Check Result
↓
Next Automation Step
A complete login workflow could look like:
Launch App
↓
Find Username Field
↓
Enter Username
↓
Find Password Field
↓
Enter Password
↓
Find Login Button
↓
Click
↓
Find Result
↓
Verify Text
The important point is that UI-element queries can become reusable building blocks inside larger Android automation scripts.
FindNode for Multi-Device UI Automation
UI-element automation becomes especially useful when the same application workflow needs to run on several Android devices.
Device 1
Device 2
Device 3
↓
Find Login Button
↓
Execute Action
If every phone uses a different screen size, the Login button may not have the same X/Y coordinate on each device. An element-based workflow can instead identify the corresponding UI element on each device.
Combined with Total Control's Multi-Device Control Center, FindNode can be used as part of multi-device Android UI automation workflows.
This can be useful for:
- Cross-device UI testing.
- Repeated application operations.
- Compatibility testing.
- Device lab workflows.
- Running the same UI flow across several physical Android devices.
For a broader discussion of scripts, APIs, and multi-device Android automation architecture, see the Android Automation guide.
FindNode vs Coordinate Automation
| Method | How It Finds the Target | Main Advantage | Best Fit |
|---|---|---|---|
| Coordinate Automation | Uses X/Y screen position | Simple and direct | Stable layouts and similar devices |
| FindNode UI Automation | Finds a UI element from its properties | Less dependent on fixed positions | Different resolutions, UI testing, element-based workflows |
Coordinate Automation
Coordinate automation:
- Uses screen positions.
- Works directly with X/Y locations.
- Is sensitive to layout and resolution changes.
- Is simple when every device uses the same stable interface.
FindNode UI Automation
FindNode:
- Uses Android UI elements.
- Builds queries from element information.
- Can locate the target at runtime.
- Is more suitable when element positions vary.
- Can be combined with testing, scripts, and multi-device workflows.
When Should You Use UI Elements Instead of Coordinates?
Use UI element-based automation when:
- The same workflow runs on different device models.
- Screen resolutions are not identical.
- UI elements may move between devices.
- You need to read text or inspect UI properties.
- Tests need to verify whether an element is enabled, checked, or visible.
- You want reusable queries inside automation scripts.
- A workflow needs to find an element after scrolling.
Coordinates can still be useful when:
- Devices are identical.
- The layout is fixed.
- The target does not expose useful UI information.
- A quick, simple interaction is more important than cross-device flexibility.
The two methods do not have to be mutually exclusive. A practical automation workflow can use element-based operations where reliable UI nodes are available and coordinate actions where a fixed screen position is appropriate.
A Practical FindNode Workflow
- Connect the Android device.
- Open the target application.
- Open UI Explorer.
- Inspect the target UI element.
- Review properties such as text, Resource ID, Class Name, Description, and Bounds.
- Build a FindNode query.
- Test whether the query identifies the correct node.
- Execute an action such as click or get text.
- Add the working query to a larger automation script if needed.
- Test the workflow on additional Android devices.
This keeps the debugging process manageable. Instead of building a complete script first and then trying to discover why it fails, you validate the UI element and query before using it in a larger workflow.
FAQ
What is Android UI automation?
Android UI automation identifies and interacts with Android interface elements such as buttons, text fields, and labels instead of relying only on fixed screen coordinates.
What is the difference between Android automation and Android UI automation?
Android automation is a broad category that can include scripts, APIs, application launching, APK installation, and multi-device operations. Android UI automation focuses specifically on identifying and interacting with elements displayed in the Android interface.
What is FindNode?
FindNode is a Total Control feature for locating Android UI elements through queries and then obtaining information or performing actions on matching nodes.
What information can be used to find Android UI elements?
UI Explorer can expose properties such as text, Resource ID, Class Name, Description, Bounds, and other node information that can be used to construct a FindNode query.
Can FindNode replace coordinate automation?
FindNode provides a more flexible approach when UI elements move because of different resolutions or layouts. Coordinate automation can still be useful for fixed and predictable interfaces.
Can FindNode work with multiple Android devices?
Yes. FindNode can be combined with multi-device workflows so corresponding UI elements can be located and operated across several Android devices.
For a broader introduction to real-device scripting, APIs, and multi-device workflows, read Android Automation.
To explore UI-based Android control and automation, visit Total Control – Control Android from PC.