FindNode 示例
更多信息请参阅 FindNode 用户指南。
要开始进行 FindNode 编程,你需要以下三个组成部分:
1. UI Explorer
(主面板 → Scripts → Tools → UI Explorer)
UI Explorer 可让你查看单个 UI 元素的属性。你也可以在这里通过定位并验证你感兴趣的节点,来尝试和验证 FindNode 查询语法。
2. Terminal
(主面板 → Scripts → Terminal)
系统提供了三个 Terminal 窗口。Terminal 用于通过其唯一的命令 sendAai() 以交互方式尝试 FindNode 编程。这是一种非常便捷的方式,可直接针对已连接的设备测试你的查询。
3. JavaScript(Rhino)
使用 UI Explorer 生成 FindNode 查询,使用 Terminal 通过 sendAai() 进行测试,然后使用 JavaScript(Rhino)将所有内容组合成可复用的自动化脚本。
SigmaTestApp
我们创建了一个名为 SigmaTestApp 的应用,用于帮助你尝试我们的查询语法、sendAai() 以及基础脚本功能。
如果你已连接 Android 设备,可以直接从 Total Control 启动它:
… → 打开 SigmaTestApp
如果你的设备上尚未安装 SigmaTestApp,Total Control 会自动安装并随后启动该应用。
UI Explorer 中的示例节点
FindNode 是基于节点的:屏幕上的大多数 UI 元素都可以被搜索,并对其执行操作。
屏幕上的每一个 UI 元素都以一个节点的形式表示。一个节点:
- 由一个唯一的 ID 标识(在当前屏幕上唯一),并且
- 拥有一组可用于查询的属性。
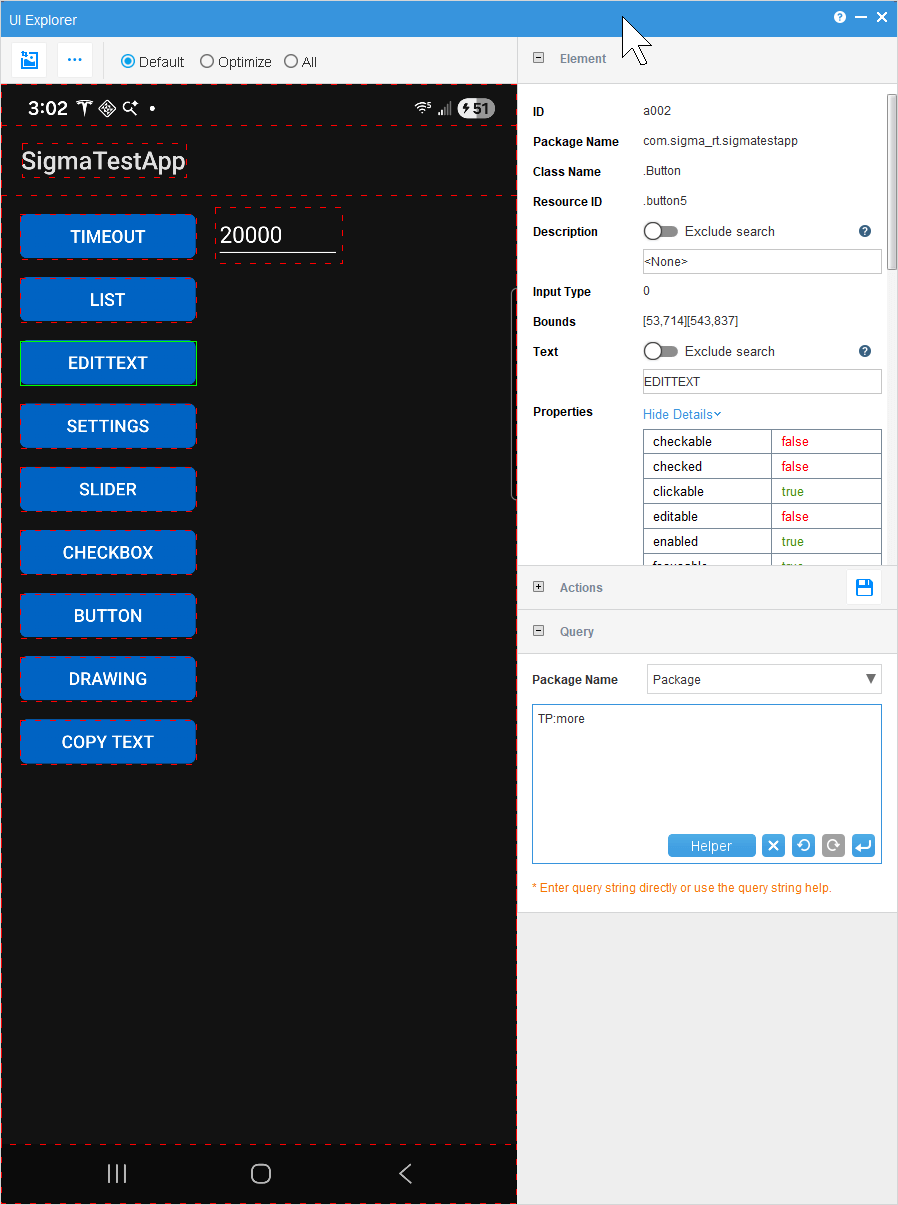
在下面的截图中,SigmaTestApp 中的 EDITTEXT 按钮被选中。在 UI Explorer 的右侧,你可以看到该节点的信息:
- ID:a002
- 包名(Package Name):com.sigma_rt.sigmatestapp
- 类名(Class Name):.Button
- 资源 ID(Resource ID):.button5
- 边界(Bounds):[53,714][543,837]
- 文本(Text):EDITTEXT
- 属性(Properties):例如 clickable = true、enabled = true、checkable = false 等。
这些字段是构建 FindNode 查询的基础。在后续示例中,我们将展示如何通过 ID、文本、类名或其他属性来定位该节点(即 EDITTEXT 按钮),并使用 sendAai() 与 JavaScript 对其执行操作。
查询
基础查询
基础查询作用于单个 UI 元素的属性。与 FindNode 的交互通过 “sendAai()” 来完成。
最基础的查询是一个空对象:
var output = device.sendAai({});默认模板为 “more”(除非你通过 setConfig 进行修改),默认动作是 “getIds”。因此,下面的写法与上面的基础查询是等价的:
var output = device.sendAai({ query: "TP:more", action: "getIds" });这将返回屏幕上的大多数节点。action: “getIds” 的默认返回结果是一个节点 ID 列表,例如:
{ count: 89, ids: ["80006cbe","7440","7bc2","7f83","8344","8705","8ac6","8e87","1f6e7", …] }示例
按节点属性进行过滤
{ query: "CC:!=0" }          	// 子节点数量不为 0 的节点
{ query: "CC:>0" }           	// 与上面相同,子节点数量 > 0
{ query: "IT:>10000" }       	// (自定义)inputType 值大于 10000 的节点
{ query: "CC:!=0&&IT:>10000" }
// 子节点数量不为 0 且 inputType 大于 10000 的节点
输入文本
// 在最后一个可编辑的文本框中输入 "Hello"
{ query: "BP:editable&&IX:-1", action: "setText(Hello)" }
// 查找一个空的文本框,其 *初始* 文本为 "Input text here"
//(提示文本以普通文本形式显示),并将其替换为 "Hello"
{ query: "T:Input text here", action: "setText(Hello)" }// 查找一个 *提示文本(hint text)* 为 "Input text here" 的输入框并输入 "Hello"。
// 与 T 不同,HT 仅匹配提示文本;setText 不会覆盖提示文本本身。
// 更好的解决方案。
{ query: "HT:Input text here", action: "setText(Hello)" }匹配多行文本
device.sendAai({
	query: "T:*REAL, \nSANTA CLARA*",
	action: "getText"
});
/* 示例返回值: */
{ retval: "9999 EL CAMINO REAL,\nSANTA CLARA, CA 95555" }
滚动与点击
// 滚动直到找到匹配项,然后点击第一个匹配的节点:
device.sendAai({
	actions: ["scrollIntoView(T:ci:john, down, 2);click"]
});
该示例最多向下滚动 2 页,搜索文本中包含 john(不区分大小写)的节点,并在其可见后点击第一个匹配项。
扩展查询
扩展查询作用于屏幕上的多个节点,允许你搜索跨越多个 UI 元素的模式或节点之间的关系。
示例 1:查找底部导航栏上的图标和标签。你可以使用 UI Explorer,点击截图,在查询中输入 “TP:appNavBar” 并按下回车(TP:appNavBar 于 20 版本中引入)。

>> device.sendAai({query:"TP:line,bottom,-1", action:"getText"})
{count: 5, retval: ['Alarms','World Clock','Timers','Stopwatch','Bedtime']}
>> device.sendAai({query:"TP:appNavBar,labels", action:"getText"})
{count: 5, retval: ['Alarms','World Clock','Timers','Stopwatch','Bedtime']
通过使用偏移量(OX/OY)、索引(IX)或诸如 “T:” 这样的查询方式,你几乎可以定位上述示例中的每一个节点。下面 4 个示例展示了如何点击 “Stopwatch” 上方的图标:
>> device.sendAai({query:"TP:line,bottom,-1&&IX:3&&OY:-1", action:"getIds;click"})
{count: 2, list: [{count: 1, retval: ['3ee03']},{retval: true}]}
>> device.sendAai({query:"TP:appNavBar,icons&&IX:3", action:"getIds;click"})
{count: 2, list: [{count: 1, retval: ['3ee03']},{retval: true}]}
要确认当前选中了哪个节点,可以使用 “BP:selected”。由于我们点击的是图标,因此该图标会被选中,下面通过 ID 进行验证:
>> device.sendAai({query:"TP:appNavBar,icons&&BP:selected", action:"getIds;getText(OY:1)"})
{count: 2, list: [{count: 1, retval: ['3ee03']},{retval: 'Stopwatch'}]}
示例 2:在“关于手机(About Phone)”中查找 Android 版本号。在第二个屏幕中,输入 “T:Android version&&OY:1”,将会显示 16:
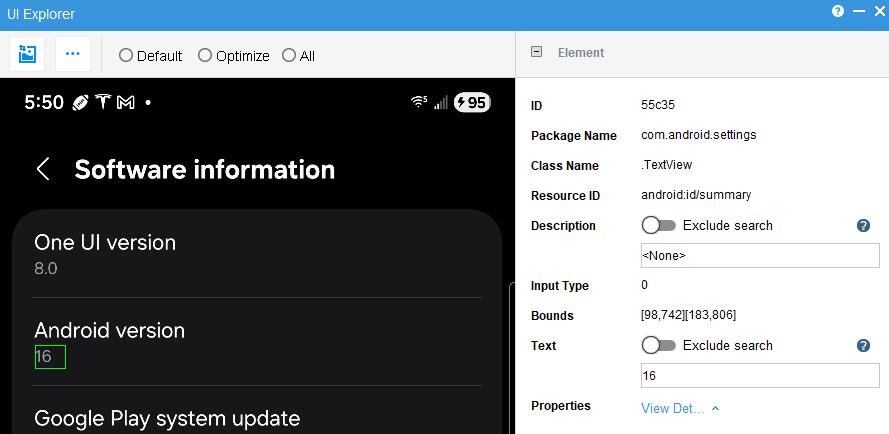
>> device.sendAai({action:`openAndroidSetting(DEVICE_INFO_SETTINGS);
	click(T:Software information);
	refreshQuery;
	getText('T:Android version&&OY:1')`})
{count: 4, list: [{retval: true},{retval: true},{retval: true},{retval: '16'}]}
>>device.sendAai({action:`openAndroidSetting(DEVICE_INFO_SETTINGS);
clickForNewWindow(T:Software information);
getText('T:Android version&&OY:1')`})
{count: 3, list: [{retval: true},{retval: true},{retval: '16'}]}获取版本号:
>> var x = device.sendAai(...);
>> x.list.at(-1).retval
16
示例 3:在 Teams 的文本输入框中输入文字,可以在输入前后通过 UI Explorer 进行观察(可能需要截取 2 张截图)。
输入文本之前:

文本输入完成后,需要点击按钮发送(相隔 2 个偏移量:OX:2):

这可以通过一条查询命令来完成;或者,也可以将 “TP:textInput” 替换为 “BP:editable”。
>> var input = "Hello";
// 使用反引号
>> device.sendAai({query:"TP:textInput", actions:[`setText('${input}')`, 'click(OX:2)']});
{count: 2, list: [{retval: true},{retval: true}]}
另一种方式是使用变量替换,并通过 “;” 作为多个动作的分隔符:
>> device.sendAai({query:"TP:textInput", actions:`setText('${input}');click(OX:2)`})
{count: 2, list: [{retval: true},{retval: true}]}
下面的函数在聊天(Chat 或 Contact)界面中运行,用于查找某个人的名字、点击进入、发送消息并返回主页面。在这种情况下,需要使用 “waitQuery”,以确保消息发送完成后再点击返回键。
>> function sendTeams(device, name, text) {
	var retval = device.sendAai({actions:[
		`scrollIntoView(T:${name})`,
		"click",
		"newQuery(TP:textInput)",
		`setText('${text}')`,
		"click(OX:2)",
		"waitQuery(HT:Type a message)",
		"sendKey(Back)"
	]});
	if (retval == null) {
		print("Error: " + lastError());
		return false;
	}
	print(retval);
	return true;
}
调用该函数:
>> sendTeams(device, "John", "Hello, how are you?")
{count: 7, list: [{retval: true},{retval: true},{retval: 1},{retval: true},{retval: true},{retval: true},{retval: true}]}
上述示例也可以使用 FindNode 中的 “function” 命令来完成:
>> device.sendAai({action:"function(sendTeams)", sendTeams:[
	`scrollIntoView(T:%1)`,
	"click",
	"newQuery(TP:textInput)",
	`setText('%2')`,
	"click(OX:2)",
	"waitQuery(T:Type a message)",
	"sendKey(Back)"]})
{retval: true}
调用该函数:
>> device.sendAai({action:"sendTeams(John, 'Hello, how are you?')"})
			{retval: true}
将其放入脚本中:先 restartApp(Teams) 或 openApp(Teams),然后调用 sendSkype() 来发送消息。
>> device.sendAai({action:"openApp(Teams);sendTeams(John, 'Hello, how are you?')"})
{count: 2, list: [{retval: true},{retval: true}]}
示例 4:打开三星计算器,获取计算器中各个按钮的节点 ID,根据算式创建一个元素数组,并使用 “forEach” 依次点击元素数组中的按钮以得到计算结果。
var {getDevice} = require('sigma/device');
var idList = {};

function sendAai(obj) {
	var retval = getDevice().sendAai(obj);
	if (retval == null) {
		throw "Error on: " + JSON.stringify(obj) + ":" + lastError();
	}
	print("$ " + JSON.stringify(obj) + "\n" + JSON.stringify(retval));
	return retval;
}

function init() {
	sendAai({action:"openApp(com.sec.android.app.popupcalculator)"});
	var list = sendAai({query:"T:/^[0-9+=-]$/", action:"getNodes(T)"}).retval;
	list.forEach((p) => idList[p.text+""] = p.id);
}

function calc(formula) {
	var fList = formula.split("");
	var elemList = [];
	fList.forEach((p) => elemList.push(idList[p]));
	print(elemList);
	elemList.push(idList['=']);
	// nsClick 不会等待同步,因此需要 sleep 以确保按键操作被处理完成
	sendAai({elements:elemList, action:"forEach(nsClick);sleep(500)"});
	var result = sendAai({actions:"refresh(*R:.calc_edt_formula);getText"}).list[1].retval;
	return parseInt(result);
}

init();
print("Result is: " + calc("123+456"));
可以将以上代码保存为一个文件(例如 “/tmp/excalc.js”),然后运行:
>> var exitCode = sigmaLoad('/tmp/excalc.js')
$ {"action":"openApp(com.sec.android.app.popupcalculator)"}
{"retval":true}
$ {"query":"T:/^[0-9+=-]$/","action":"getNodes(T)"}
{"count":12,"retval":[{"id":"15caa","text":"7"},{"id":"1606b","text":"8"},{"id":"1642c","text":"9"},{"id":"16bae","text":"4"},{"id":"16f6f","text":"5"},{"id":"17330","text":"6"},{"id":"17ab2","text":"1"},{"id":"17e73","text":"2"},{"id":"18234","text":"3"},{"id":"185f5","text":"+"},{"id":"18d77","text":"0"},{"id":"194f9","text":"="}]}
17ab2,17e73,18234,185f5,16bae,16f6f,17330
$ {"elements":["17ab2","17e73","18234","185f5","16bae","16f6f","17330","194f9"],"action":"forEach(nsClick);sleep(500)"}
{"count":2,"list":[{"count":8,"retval":[{"retval":true},{"retval":true},{"retval":true},{"retval":true},{"retval":true},{"retval":true},{"retval":true},{"retval":true}]},{"retval":true}]}
$ {"actions":"refresh(*R:.calc_edt_formula);getText"}
{"count":2,"list":[{"retval":true},{"retval":"579 Calculation result"}]}
Result is: 579
示例 5:获取特斯拉(Tesla)的里程表读数,使用以下命令:

查找 “<数字> miles”:
>>  device.sendAai({action:"openApp(Tesla);scrollIntoView(T:/^[0-9,]+ miles$/);getText"});
{count: 3, list: [{retval: true},{retval: true},{retval: '9,999 miles'}]}
查找 VIN,并向上移动一行(OY:-1)。第一个匹配到的格式通常非常接近显示“<数字> mi”的剩余电量信息。
>>  device.sendAai({action:"openApp(Tesla);scrollIntoView(T:VIN:&&OY:-1);getText"});
{count: 3, list: [{retval: true},{retval: true},{retval: '9,999 miles'}]}
同时获取里程读数和 VIN:
>>  device.sendAai({action:"openApp(Tesla);scrollIntoView(T:VIN:);getText(OY:-1);getText(OX:1)"});
{count: 4, list: [{retval: true},{retval: true},{retval: '9,999 miles'},{retval: 'XXXXXXXXXXXXXXXXX'}]}