- Query in Action I
-
Query in Action II
- Example 1: Finding nodes on the bottom navigation bar.
- Example 2: Get the first page stock tickers from Yahoo Finance.
- Example 3: Enter text in Skype text box.
- Example 4: Opening the calculator to perform calculations.
- Example 5: Use "T:<text>" and offset to click the icons.
- Example 6: Getting the name (or phone number) in the chat window.
- Example 7: Locate and click with ease.
-
Query in Action III
- Example 1: Shopping in the grocery app.
- Example 2: Use "checked" to manipulate the checkboxes.
- Example 3: The order of OY and OX is important.
- Example 4: Using "+" to match nodes in a new window.
- Example 5: Getting elements in bottom navigation bar on non-scrollable application.
- Example 6: Write a function to return SolarEdge production.
- Example 7: Obtains the solar production from SolarEdge and change the charging current in Tesla.
FindNode Examples
FindNode Examples
Please refer to FindNode User Guide for more information.
Query in Action I
The most basic query is "{}" or in TC:
var output = device.sendAai({})The default "template" is "more" (unless "setConfig" to change it), the default action is "getIds", same as above:
var output = device.sendAai({query:"TP:more", action:"getIds"})This returns most of the nodes on the screen and the default return is a list of nodes ID (action: "getIds"):
{count: 89, ids: ['80006cbe','7440','7bc2','7f83','8344','8705','8ac6','8e87','1f6e7',…]}You can do something like:
{query: "CC:!=0"} or {query:"CC:>0}: non-zero child count.
{query:"IT:>10000"}: accept custom input type value that is greater than 10 thousand.
{query:"CC:!=0&&IT:>10000"}: find nodes with non-zero child count AND input type is greater than 10,000.
{query:"TP:textInput&&IX:2", action:"setText(Hello)"}: find third text field and enter "Hello" in the text field.
{query:"T:Input text here", action:"setText(Hello)"}: find empty text field has initial hint text, search the hint and enter "Hello".
>> device.sendAai({query:"T:*REAL, \nSANTA CLARA*", action:"getText"})
{retval: '3367 EL CAMINO REAL,
SANTA CLARA, CA 95051'}
>> device.sendAai({actions:["scrollIntoView(T:ci:john)", "click"]})
Query in Action II
Example 1: Finding nodes on the bottom navigation bar:

>> device.sendAai({query:"TP:line,bottom,-1", action:"getText"})
{retval: ['Chats','Calls','Contacts','Today']}
By using offset (OX/OY), index (IX) or query such as "T:", you can locate almost every node on the above examples, below 4 examples on click icon on top of the "Contacts":
>> device.sendAai({query:"TP:line,bottom,-1&&IX:2&&OY:-1", action:"click"})
{retval: true}
>> device.sendAai({query:"TP:line,bottom,-2&&IX:2", action:"click"})
{retval: true}
>> device.sendAai({query:"TP:line,bottom,-1&&T:Contacts&&OY:-1", action:"click"})
{retval: true}
>> device.sendAai({query:"TP:line,bottom,-1", action:"click(T:Contacts&&OY:-1)"})
{retval: true}
Example 2: Assuming you want to first page stock tickers from Yahoo Finance:
>> device.sendAai({query:"R:.ticker&&T:/[A-Z]{1,4}/", action:"getText"}).retval.forEach(
    (p) => {print( p + ":" +
            device.sendAai({action:"getDescription(OX:1&&T:" + p + ")"}).retval
            )
        }
    )
TGT:164.76
T:16.76
AAPL:154.48
SBUX:92.14
TSLA:309.07
CSCO:43.30
Example 3: Enter text in Skype text box:
Before entering text:

After text is input, need to click the button to send:

This can be done by using in one query command:
>> var input = "Hello";
// Use backtick
>> device.sendAai({query:"TP:textInput", actions:[`setText('${input}')`, 'click(OX:2)']});
{count: 2, list: [{retval: true},{retval: true}]}

Another way is using variable substitution along with ";" as separator for multiple actions:
>> device.sendAai({query:"TP:textInput", actions:`setText('${input}');click(OX:2)`})
{count: 2, list: [{retval: true},{retval: true}]}
The following function to find the person, click, send a message and return back to main page. In this case, "waitQuery" is required to ensure the text is sent before clicking Back key.
>> function sendSkype(device, name, text) {
    var retval = device.sendAai({actions:[
        `scrollIntoView(T:${name})`,
        "click",
        "newQuery(TP:textInput)",
        `setText('${text}')`,
        "click(OX:2)",
        "waitQuery(T:Type a message)",
        "sendKey(Back)"
    ]});
    if (retval == null) {
        print("Error: " + lastError());
        return false;
    }
    print(retval);
    return true;
}

>> sendSkype(device, "John", "Hello, how are you?")
{count: 7, list: [{retval: true},{retval: true},{count: 1},{retval: true},{retval: true},{retval: true},{retval: true}]}
The above can also be done using the example described in "function":
>> device.sendAai({action:"function(sendText(Hello))", sendText:[
    "newQuery(TP:textInput)",
    "setText(%1)",
"click(OX:2)",
"waitQuery(T:Type a message)"
]})
{retval: true}
>> var input = "Good morning"
>> device.sendAai({action:`sendText(${input})`})
{sendText: [{count: 1},{retval: true},{retval: true},{retval: true}]}
The function below will find a name, click to chat screen, send a text using "sendText" function just created, click back key to go back to main screen (if you are using non-Sigma keyboard, use two sendKey(Back)).
>> device.sendAai({action:"function(findAndSend)", findAndSend:"scrollIntoView(T:%1);click;sendText(%2);sendKey(Back)"})
{retval: true}

function sendSkype(device, name, text) {
var retval = device.sendAai({action:`findAndSend(${name}, '${text}')`});
    if (retval == null) {
        print("Error: " + lastError());
        return false;
    }
    print(retval);
    return true;
}

>> sendSkype(device,"John", "Hello, how are you?");
{findAndSend: [{retval: true},{retval: true},{sendText: [{count: 1},{retval: true},{retval: true},{retval: true}]},{retval: true}]}
To put this into script: restartApp(skype) or openApp(Skype) and call sendSkype() to send message.
Example 4: This opens up Samsung calculator, obtain the node IDs of the buttons in calculator, create an element array from a formula and use "forEach" to click thru the element array to obtain the result.
var idList = {};
var device;

function sendAai(obj) {
    var retval = getDevice().sendAai(obj);
    if (retval == null) {
        throw "Error on: " + JSON.stringify(obj) + ":" + lastError();
    }
    print("$ " + JSON.stringify(obj) + "\n" + JSON.stringify(retval));
    return retval;
}

function init(device) {
    getDevice = () => device;
    sendAai({action:"openApp(com.sec.android.app.popupcalculator)"});
    var list = sendAai({query:"T:/^[0-9+=-]$/", action:"getNodes(T)"}).list;
    list.forEach((p) => idList[p.text+""] = p.id);
}

function calc(formula) {
    var fList = formula.split("");
    var elemList = [];
    fList.forEach((p) => elemList.push(idList[p]));
    print(elemList);
    elemList.push(idList['=']);
    sendAai({elements:elemList, action:"forEach(nsClick)"});
    return sendAai({actions:"refresh(*R:.calc_edt_formula);getText"}).list[1].retval;
}

var getDevice = () => device;
init(device);
print(calc("123+456"));

$ {"action":"openApp(com.sec.android.app.popupcalculator)"}
{"retval":true}
$ {"query":"T:/^[0-9+=-]$/","action":"getNodes(T)"}
{"count":12,"list":[{"id":"c734","text":"7"},{"id":"caf5","text":"8"},{"id":"ceb6","text":"9"},{"id":"d638","text":"4"},{"id":"d9f9","text":"5"},{"id":"ddba","text":"6"},{"id":"e53c","text":"1"},{"id":"e8fd","text":"2"},{"id":"ecbe","text":"3"},{"id":"f07f","text":"+"},{"id":"f801","text":"0"},{"id":"ff83","text":"="}]}
$ {"elements":["e53c","e8fd","ecbe","f07f","d638","d9f9","ddba","ff83"],"action":"forEach(nsClick)"}
{"retval":[{"retval":true},{"retval":true},{"retval":true},{"retval":true},{"retval":true},{"retval":true},{"retval":true},{"retval":true}]}
$ {"actions":"refresh(*R:.calc_edt_formula);getText"}
{"count":2,"list":[{"retval":true},{"retval":"579 Calculation result"}]}
579 Calculation result
Example 5: On the first example, you can use "T:<text>" and offset to click the icons, some applications do not provide the label for the bottom navigation bar:

Since this is display on the last line, we can use “TP:line,bottom,-1” to return the nodes, use “IX” to locate a single node from the list of nodes. For example: to click the Search icon:
device.sendAai({query:"TP:line,bottom,-1&&IX:2", action:"click"})Example 6: In certain chat window, it shows the name (or phone number), to obtain it, use the following queries:

>> device.sendAai({query:"TP:line,top,1&&IX:1", action:"getText"})
{retval: (999)999-9999}
To go back, click left arrow:
>> device.sendAai({query:"TP:line,top,1&&IX:0", action:"click"})
{retval: true}
Note: The new version of "Messages", "TP:line" no longer works, you can still retrieve first line or last line of information, use "VG" to obtain group information and "RN" to reduce to interested nodes..
First line:

>> device.sendAai({query:"TP:reduced&&IX:0&&VG&&RN&&ST:x"})
{count: 6, ids: ['1669cf','168f59','16931a','1696db','169a9c','167151']}
To obtain the name:
>>  device.sendAai({query:"TP:reduced&&VG&&RN&&ST:x&&IX:1", action:"getText"})
{retval: 'Daniel'}
>> device.sendAai({query:"TP:reduced&&VG&&RN&&ST:x", action:"getText(IX:1)"})
{retval: 'Daniel'}
>> device.sendAai({query:"TP:reduced&&VG&&RN&&ST:x", action:["addQuery(IX:1)", "getText"]})
{count: 2, list: [{count: 1},{retval: 'Daniel'}]}
Last line:

>> device.sendAai({query:"TP:reduced&&IX:-1&&VG&&RN&&ST:x"})
{count: 5, ids: ['16227c','162dbf','15db29','15deea','16570a']}
Want to enter the text and click send button, use the offset of 2 to locate the send button:

>> device.sendAai({query:"TP:textInput", action:["setText(Hello)", "click(OX:2)"]})
{count: 2, list: [{retval: true},{retval: true}]}
Example 7: Locate and click with ease.

To click the arrow, use:
>> device.sendAai({query:"T:Channels&&OX:1", action:"click"})
{retval: true}
Query in Action III
Example 1: Consider the following grocery app:
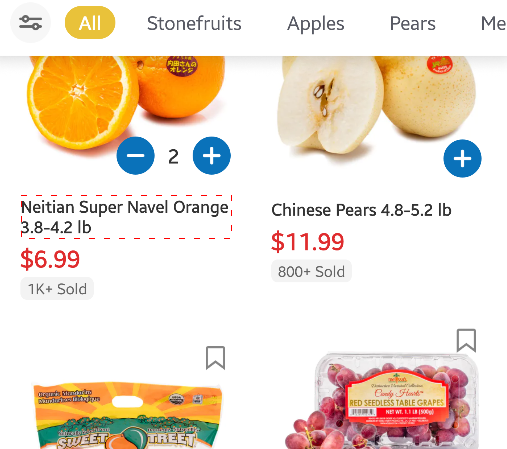
"scrollIntoView" will scroll until "*Orange*" is found and store "Valencia Oranges …" node in ML, VG will obtain ViewGroup. Use UI Explorer to find out the resource ID of the price and the "+" button to add into the cart. "scrollIntoView" will make the found node fully visible, since the node is the name of the fruit, is fully visible but the image is obscured. Add a "Viewgroup" will make it work.
>> device.sendAai({actions:[
    "scrollIntoView(T:*Orange*)",
    "addQuery(VG)",
    "showOnScreen",
    "getText(R:.tv_price)",
    "click(R:/.iv_edit_right|.tv_num/)"
]})
{count: 5, list: [{retval: true},{count: 13},{retval: true},{retval: '$6.99'},{retval: true}]}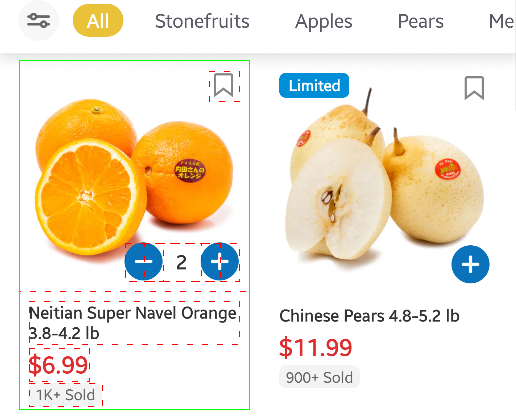
Version 14 will allow "scrollIntoView" to return more than one node, simpler:
>> device.sendAai({actions:[
    "scrollIntoView(T:*Oranges*&&VG)",
    "getText(R:.tv_price)",
    "click(R:.iv_edit_right)"
]})
{count: 5, list: [{retval: true},{count: 8},{retval: true},{retval: '$6.99'},{retval: true}]}
Example 2: Use "checked" to manipulate the checkboxes.
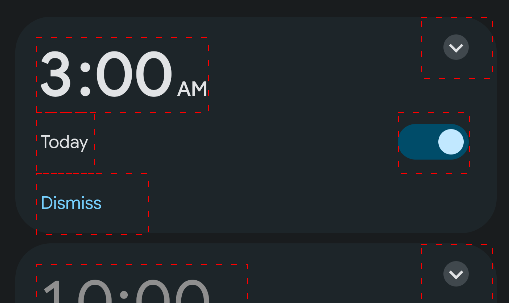
To expand to detail alarm information, "\s" to match different kind of white space:
>> device.sendAai({query:"T:/3:00\\sAM/&&OX:1", action:"click"})
{retval: true}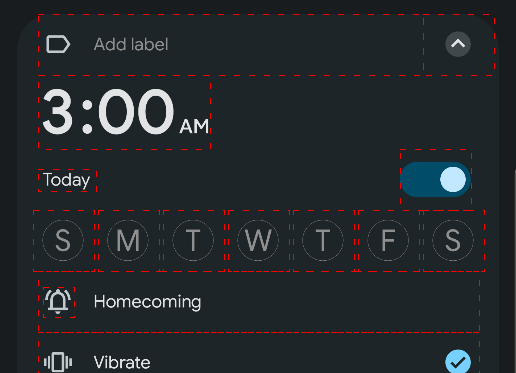
To change the checked box next to today from true to false, use "checked", still need to use "3:00 AM" as anchor since there may have other alarms with "Today" on the screen.
>> device.sendAai({query:"T:/3:00\\sAM/&&OY:1&&OX:1", actions:["getChecked", "setChecked(false)", "getChecked"]})
{count: 3, list: [{retval: true},{changedCount: 1},{retval: false}]}
Next:

Here is recurring alarm from Sunday to Saturday, for instance, it is using "D:Sunday" and "T:S" to represent the first checkbox. Use intersectX (TX) to get all checked boxes. In this example "C:.CheckBox" is not needed but nice to have as example:
>> device.sendAai({action:"getDescription(D:Sunday&&C:.CheckBox&&TX)"})
{retval: ['Sunday','Monday','Tuesday','Wednesday','Thursday','Friday','Saturday']}
To check on all checkboxes, setChecked support query, it returns how many has been changed.
>> device.sendAai({query:"D:Sunday&&C:.CheckBox&&TX", action:"setChecked(true)"})
{changedCount: 7}
There are several ways to turn off Sunday and Saturday:
>> device.sendAai({query:"D:/Sunday|Saturday/", action:"setChecked(false)"})
{changedCount: 2}
>> device.sendAai({query:"T:S", action:"setChecked(false)"})
{changedCount: 2}
To obtain the value of these checkboxes:
>> device.sendAai({query:"D:Sunday&&C:.CheckBox&&TX", action:"getChecked"})
{retval: [false,true,true,true,true,true,false]}
Example 3: The order of OY and OX is important, below is one of the developer options:
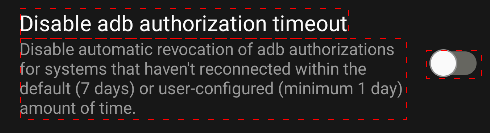
"Disable adb authorization timeout" does not have node on the right side so apply offset on X will get null:
>> device.sendAai({query:"T:Disable adb authorization*&&OX:1&&OY:1"})
null
>> lastError()
Offset out of range
If the order of "OX" and "OY" is reversed, it will work, it applies offset on Y before X, will get proper node:
>> device.sendAai({query:"T:Disable adb authorization*&&OY:1&&OX:1"})
{count: 1, ids: ['25c8d4']}
>> device.sendAai({query:"T:Disable adb authorization*&&OY:1&&OX:1", action:"getChecked"})
{retval: false}
>> device.sendAai({query:"T:Disable adb authorization*&&OY:1&&OX:1", actions:["setChecked(true)", "getChecked"]})
{count: 2, list: [{changedCount: 1},{retval: true}]}
Put everything together, use "openAndroidSetting" to open developer options:
>> device.sendAai({actions:[
    "openAndroidSetting(APPLICATION_DEVELOPMENT_SETTINGS)",
    "scrollIntoView(T:Disable adb authorization*)",
    "addQuery(OY:1&&OX:1)",
    "setChecked(true)",
    "sendKey(Back)"
]})
{count: 5, list: [{retval: true},{retval: true},{count: 1},{changedCount: 1},{retval: true}]}
Example 4: Change developer option "Window animation scale" to "2x", need to use "+" to T:*2x" because it is a new window, new query is required.
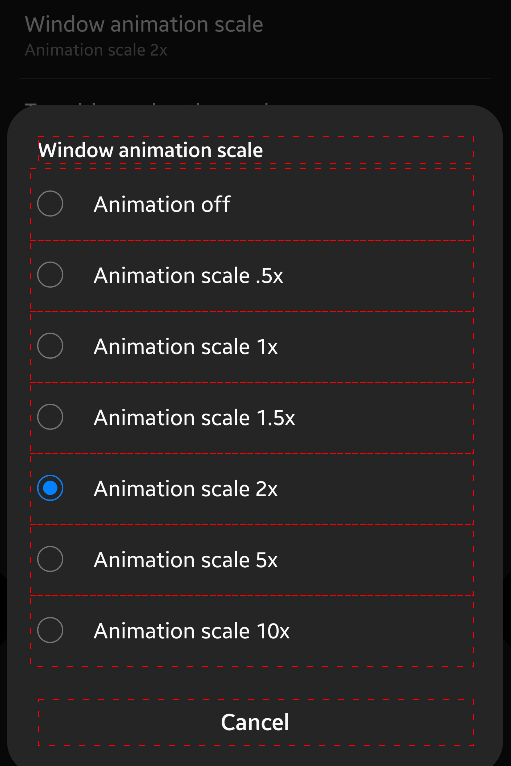
>> device.sendAai({actions:[
    "openAndroidSetting(APPLICATION_DEVELOPMENT_SETTINGS)",
    "scrollIntoView(T:Window animation scale)",
    "click",
    "click(+T:*2x)",
    "sendKey(back)"
]})
{count: 5, list: [{retval: true},{retval: true},{retval: true},{retval: true},{retval: true}]}
Example 5: Getting elements in bottom navigation bar on non-scrollable application.
For non-scrollable applications, "TP:line,bottom" will return null but it is not hard the nodes in the bottom navigation bar:

Notice the video is surrounded by image bounds.
You can use one of the labels as anchor (use "ON:last" or "IX:-1" to make sure query applies to intended nodes (last text), in case other places in screen have the same text:
>> device.sendAai({query:"T:Speed&&IX:-1&&TX", action:"getText"})
{retval: ['Speed',{},'Video','Status','Map','VPN']}
Notice there is a null node since "TX" will return the image node without a text/description. Add post basic query "XT" that match any character to remove it:
>> device.sendAai({query:"T:Speed&&IX:-1&&TX&&XT:/./", action:"getText"})
{retval: ['Speed','Video','Status','Map','VPN']}
What if you do not know the word in the bottom navigation bar:
>> device.sendAai({query:"TP:anyText&&IX:-1&&TX&&XT:/./", action:"getText"})
{retval: ['Speed','Video','Status','Map','VPN']}
To click second element ("Video"):
>> device.sendAai({query:"TP:anyText&&IX:-1&&TX&&XT:/./", action:"click(IX:1)"})
{retval: true}
>> device.sendAai({query:"TP:anyText&&IX:-1&&TX&&XT:/./&&IX:-1", action:"click"})
{retval: true}
It is easy to get icons, just add "OY:-1" before "TX":
>> device.sendAai({query:"TP:anyText&&IX:-1&&OY:-1&&TX", action:"getNodes('C,R')"})
{count: 5, list: [{class: '.ImageView', id: '21637d', resourceId: '.navigation_bar_item_icon_view'},{class: '.ImageView', id: '217dc4', resourceId: '.navigation_bar_item_icon_view'},{class: '.ImageView', id: '21980b', resourceId: '.navigation_bar_item_icon_view'},{class: '.ImageView', id: '21b252', resourceId: '.navigation_bar_item_icon_view'},{class: '.ImageView', id: '21cc99', resourceId: '.navigation_bar_item_icon_view'}]}
If just want to click the icon on top of VPN, use OQ:
>> device.sendAai({action:"click(T:VPN&&IX:-1&&OY:-1)"})
{retval: true}
Example 6: Write a function to return SolarEdge production:
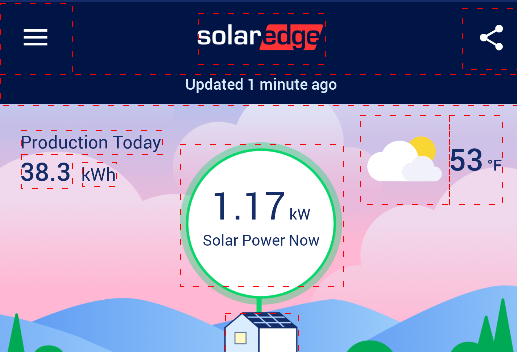
To obtain Production of Today:
>> device.sendAai({query:"T:Production Today&&OY:1", actions:["getText", "getText(OX:1)"]})
{count: 2, list: [{retval: '38.3'},{retval: 'kWh'}]}
To obtain the Solar power production:
>> device.sendAai({query:"T:*Solar Power Now", action:"getText"})
{retval: '1.17 kW
Solar Power Now'}
>> var production = device.sendAai({query:"T:*Solar Power Now", action:"getText"}).retval.split("\n",1)
1.17 kW
JavaScript to obtain the solar production of SolarEdge:
function sendAai(device, obj) {
    var retval = device.sendAai(obj);
    if (retval == null) {
        throw "Error on: " + JSON.stringify(obj) + ":" + lastError();
    }
    print(">>" + JSON.stringify(obj) + "\n" + JSON.stringify(retval));
    return retval;
}

function getSolarProduction(device) {
    var retval = sendAai(device, {actions:[
        "openApp(mySolarEdge)",
        "waitQuery(T:Lifetime,20000)",
        "newQuery(R:.pv_power_now)",
        "getText",
        "sendKey(Back)",
        "sendKey(Back)"]});
    var prodStr = retval.list[3].retval;
    var groups = prodStr.match(/(\d+(\.\d+)?) (W|kW)/);
    if (groups == null) {
        throw "Cannot find pattern in mySolarEdge";
    }
    var unit = groups.splice(-1);
    var number = groups[1];
    if (unit == "kW") {
        number = number * 1000;
    } else if (unit != "W") {
        throw "Unknown unit: " + unit;
    }
    return number;
}

>> getSolarProduction(device)
>> {"actions":["openApp(mySolarEdge)","waitQuery(T:Lifetime,20000)","newQuery(R:.pv_power_now)","getText","sendKey(Back)","sendKey(Back)"]}
{"count":6,"list":[{"retval":true},{"retval":true},{"count":1},{"retval":"1.17 kW\nSolar Power Now"},{"retval":false},{"retval":true}]}
1170
Cut-n-paste from FindNode User Guide:
To obtain the SolarEdge production from mySolarEdge application:
>> device.sendAai({actions:"function(getProduction)", getProduction:[
    "openApp(mySolarEdge)",
    "waitQuery(T:Lifetime,20000)",
    "newQuery(R:.pv_power_now)",
    "getText",
    "sendKey(Back)",
    "sendKey(Back)"]});
{retval: true}
>> var info = device.sendAai({action:"getProduction"})
{getProduction: [{retval: true},{retval: true},{count: 1},{retval: '5.89 kW
Solar Power Now'},{retval: false},{retval: true}]}
Example 7: This example obtains the solar production from SolarEdge and change the charging current in Tesla. The goal is to charge the Tesla from solar production, not from the grid. It will check in 10 minutes interval.
To run it:
- You need to download and install Total Control 9.0 (Update 40) Beta 3 or official release.
- You need Professional version, install Lite version, you have 1-time offer to try Professional free for 3 days.
- Copy-n-paste the following script and paste into a file, assuming it is "/tmp/charging.js'.
- Change the values in the "settings".
- Open script terminal, and enter sigmaLoad('/tmp/charging.js'). The script will open mySolarEdge, get production, calculate the amp based on values in settings and set the correct current in Tesla app.
- Create an empty file (or any file), assuming it is named "/tmp/Afile".
- Open command prompt cd to "/tmp" directory, "copy Afile CheckNow" to check solar production again (otherwise it will wait until settings.waitInterval minutes). "copy Afile StopNow" to stop the script execution.
/*

This is an example, it checks the solar production from SolarEdge application and adjust Tesla charging current,
it will stop when the production (minus reserve) reaches below "minAmp" or non-zero retriesBeforeStop is reached.
The idea is to charge Tesla with solar energy, not from the grid.

Version: 0.1

*/

var controls = {};
var settings = {
    // How many voltage per Amp
    voltagePerAmp: 245,
    // Lower than this Amp, will exit if retriesBeforeStop is reached
    minAmp: 6,
    // Maximum Amp Tesla can accept
    maxAmp: 32,
    // Wattage to reserve for other purposes
    reserve: 500,
    // Check every x minutes
    waitInterval: 10,
    // Number of failed retries before stop, zero will not stop
    retriesBeforeStop: 0,
    // Number of zero before exit (e.g. sunset)
    retriesOnZero: 3,
    // Number of restart on error
    retriesRestart: 3,
    // Display interaction
    display: true
}

function padZero(str, length) {
    length = length || 2;
    return str.toString().padStart(length, '0');
}

function getLocalDateTimeWithAmPm() {
    const now = new Date();
    const hours = now.getHours();
    const amPm = hours >= 12 ? 'PM' : 'AM';
    const hours12 = hours % 12 || 12;
    return now.getFullYear() + '-' + padZero(now.getMonth() + 1) + '-' + padZero(now.getDate()) + ' ' +
        padZero(hours12) + ':' + padZero(now.getMinutes()) + ":" +
        padZero(now.getSeconds()) + ' ' + amPm;

}

function xprint(msg) {
    print(getLocalDateTimeWithAmPm(new Date()) + " : " + msg);
}

const fileExists = require('fs').exists;
const removeFile = require('fs').remove;
function xsleep(sleepTime) {
    const sleepInterval = 1000;
    var curTime = 0;
    while (curTime < sleepTime) {
        sleep(sleepInterval);
        curTime += sleepInterval;
        if (fileExists('/tmp/StopNow')) {
            removeFile('/tmp/StopNow')
            exitNow(0,"Stopped by user");
        }
        if (fileExists('/tmp/CheckNow')) {
            removeFile('/tmp/CheckNow');
            return;
        }
    }
}

function sendAai(obj, ignoreError) {
    ignoreError = ignoreError || false;
    var retval = getDevice().sendAai(obj);
    if (retval == null) {
        errorStr = "Error on: " + JSON.stringify(obj) + ":" + lastError();
        if (ignoreError) {
            xprint(">> " + errorStr + ". Ignored");
            return null;
        }
        throw new Error(errorStr);
    }
    if (settings.display) {
        xprint(">>" + JSON.stringify(obj) + "\n" + JSON.stringify(retval));
    }
    return retval;
}

function setCharging(newState) {
    openTesla();
    const pat = "(Start|Stop) Charging";
    const retval = sendAai({action:`newQuery('T:/${pat}/', 2000);getIds;getText`}, true);
    if (retval == null) {
        throw new Error("Cannot obtain the charging status pattern");
    }
    const id = retval.list[1].ids[0];
    const chargingString = retval.list[2].retval;
    const regExp = new RegExp(pat);
    const groups = chargingString.match(regExp);
    if (groups == null) {
        throw new Error("Invalid charging string");
    }
    // Action is reverse, "Start Charging" current is not charging.
    const curState = groups[1] == "Start" ? false : true;
    if (curState == newState) {
        return;
    }
    sendAai({elements:[id], action:"click"});
    const text = (newState ? "Start" : "Stop") + " Charging";
    return sendAai({action:`waitQuery(T:${text}, 3000)`}, true) != null;
}

var lastErrorMsg = "";
function setError(msg) {
    lastErrorMsg = msg;
}

function getError() {
    return lastErrorMsg;
}

function getSolarProduction() {
    const retval = sendAai({actions:[
        "openApp(mySolarEdge)",
        "waitQuery(T:Lifetime,25000)",
        "newQuery(R:.pv_power_now)",
        "getText",
        "sendKey(Back)",
        "sendKey(Back)"]});
    // getText
    const prodStr = retval.list[3].retval;
    const groups = prodStr.match(/^(\d+(\.?\d+)?) (W|kW)/);
    if (groups == null) {
        setError("Cannot find pattern in mySolarEdge");
        return -1;
    }
    const unit = groups.splice(-1);
    var number = groups[1];
    if (unit == "kW") {
        number = number * 1000;
    } else if (unit != "W") {
        setError("Unknown unit: " + unit);
        return -1;
    }
    return Math.round(number);
}

function startCharging() {
    return setCharging(true);
}

// Some time stop Charging will take effect on 2nd or 3rd click
function stopCharging() {
    return setCharging(false);
}

function adjAmp(num) {
    openTesla();
    var ctrl;
    var count;
    // Sometime the "<" or ">" is not fully recognized, run several times to make
    // sure the number match
    for (var i = 0; i < 5; ++i) {
        var amp = sendAai({elements:[controls.amp], action:"getText"}).retval.split(" ")[0];
        if (amp == num) {
            return true;
        } else if (amp > num) {
            ctrl = controls.less;
            count = amp - num;
        } else {
            ctrl = controls.more;
            num = Math.min(settings.maxAmp, num);
            count = num - amp;
        }
        sendAai({elements:[ctrl], action:`repeat(${count},clickWait)`});
    }
}

function init() {
    // May take 20-30 seconds to bring up the charging information
    var success = sendAai({action:"restartApp(Tesla, 'T:/(Start|Stop) Charging/', 30000)"}, true);
    if (success == null) {
        exitNow(2, "Cannot find charging information, please make sure app in charging mode");
    }
    var retval = sendAai({query:"T:/[0-9]+ A/&&TX"});
    if (retval.count != 3) {
        exitNow(3, "Cannot locate controls");
    }
    controls.less = retval.ids[0];
    controls.more = retval.ids[2];
    controls.amp = retval.ids[1];
    var solarProd = getSolarProduction();
    if (solarProd == -1) {
        exitNow(4, "Cannot obtain solar production: " + getError());
    }
    // Create a function "clickWait"
    sendAai({action:"function(clickWait)", clickWait:["sleep(200)", "nsClick"]});
    return true;
}

function start() {
    var retriesCounter = 0;
    var retriesOnZero = 0;
    while (true) {
        var solarProd = getSolarProduction();
        if (solarProd == -1) {
            throw new Error("Cannot get solar production");
        }
        if (solarProd == 0 && settings.retriesOnZero != 0) {
            retriesOnZero++;
            if (retriesOnZero >= settings.retriesOnZero) {
                exitNow(1, "Zero production");
            }
        }
        // .7 or above will carry to next integer
        var amp = Math.floor((solarProd - settings.reserve)/settings.voltagePerAmp + 0.3);
        amp = Math.min(amp, settings.maxAmp);
        amp = amp < 0 ? 0 : amp;
        xprint("Receive solar production: " + solarProd + " Watts, adjust to " + amp + " A");
        if (amp < settings.minAmp) {
            retriesCounter++;
            if (retriesCounter < settings.retriesBeforeStop || settings.retriesBeforeStop == 0) {
                stopCharging();
                xprint("Current is too low, " + amp + " A. Retrying next interval. Waiting...");
            }
        } else {
            startCharging();
            retriesCounter = 0;
            adjAmp(amp);
        }
        xsleep(settings.waitInterval*60*1000);
    }
}

function exitNow(code, msg) {
    xprint(msg);
    xprint("Exit code: " + code);
    // last attempt to stop charging
    try {stopCharging()} catch (e) {};
    exit(code);
}

if (device == null) {
    throw new Error("No device is connected");
}

const getDevice = () => device;
const openTesla = () => sendAai({action:"openApp(Tesla);sleep(300)"});

var retriesRestart = 0;
while(true) {
    try {
        init();
        start();
    } catch (e) {
        bypassExit(e);
        retriesRestart++;
        if (retriesRestart >= settings.retriesRestart) break;
        xprint("Error found: " + e);
        xprint("Restart the script");
    }
}