FindNode 案例
FindNode 案例
更多信息请参考:FindNode 用户指南。
查询示例 I
最基本的查询是 "{}" 或者在 TC 中:
var output = device.sendAai({})默认的 "template" 是 "more"(除非通过 "setConfig" 修改),默认的动作是 "getIds",与上面相同:
var output = device.sendAai({query:"TP:more", action:"getIds"})这将返回屏幕上大部分节点,且默认返回的是节点 ID 的列表(动作:"getIds"):
{count: 89, ids: ['80006cbe','7440','7bc2','7f83','8344','8705','8ac6','8e87','1f6e7',…]}你可以这样做:
{query: "CC:!=0"} 或者 {query:"CC:>0"}:非零子节点数量。
{query:"IT:>10000"}:接受大于一万的自定义输入类型值。
{query:"CC:!=0&&IT:>10000"}:查找子节点数量非零且输入类型大于一万的节点。
{query:"TP:textInput&&IX:2", action:"setText(Hello)"}:查找第三个文本字段并在文本字段中输入 "Hello"。
{query:"T:Input text here", action:"setText(Hello)"}:查找具有初始提示文本的空文本字段,搜索提示并输入 "Hello"。
>> device.sendAai({query:"T:*REAL, \nSANTA CLARA*", action:"getText"})
{retval: '3367 EL CAMINO REAL,
SANTA CLARA, CA 95051'}
>> device.sendAai({actions:["scrollIntoView(T:ci:john)", "click"]})
查询示例 II
示例 1: 查找底部导航栏上的节点:

>> device.sendAai({query:"TP:line,bottom,-1", action:"getText"})
{retval: ['Chats','Calls','Contacts','Today']}
通过使用偏移量(OX/OY)、索引(IX)或诸如“T:”之类的查询,您几乎可以找到上述示例中的每个节点,下面是“联系人”顶部单击图标的 4 个示例:
>> device.sendAai({query:"TP:line,bottom,-1&&IX:2&&OY:-1", action:"click"})
{retval: true}
>> device.sendAai({query:"TP:line,bottom,-2&&IX:2", action:"click"})
{retval: true}
>> device.sendAai({query:"TP:line,bottom,-1&&T:Contacts&&OY:-1", action:"click"})
{retval: true}
>> device.sendAai({query:"TP:line,bottom,-1", action:"click(T:Contacts&&OY:-1)"})
{retval: true}
示例 2: 假设您想从 Yahoo Finance 获取第一页股票代码:
>> device.sendAai({query:"R:.ticker&&T:/[A-Z]{1,4}/", action:"getText"}).retval.forEach(
    (p) => {print( p + ":" +
            device.sendAai({action:"getDescription(OX:1&&T:" + p + ")"}).retval
            )
        }
    )
TGT:164.76
T:16.76
AAPL:154.48
SBUX:92.14
TSLA:309.07
CSCO:43.30
示例 3: 在 Skype 文本框中输入文本:
输入文字前:

输入文字后,需要点击发送按钮:

这可以通过在一个查询命令中使用来完成:
>> var input = "Hello";
// Use backtick
>> device.sendAai({query:"TP:textInput", actions:[`setText('${input}')`, 'click(OX:2)']});
{count: 2, list: [{retval: true},{retval: true}]}

Another way is using variable substitution along with ";" as separator for multiple actions:
>> device.sendAai({query:"TP:textInput", actions:`setText('${input}');click(OX:2)`})
{count: 2, list: [{retval: true},{retval: true}]}
下面的功能是找人,点击,发送消息,返回主页面。 在这种情况下,需要“waitQuery”以确保在单击返回键之前发送文本。
>> function sendSkype(device, name, text) {
    var retval = device.sendAai({actions:[
        `scrollIntoView(T:${name})`,
        "click",
        "newQuery(TP:textInput)",
        `setText('${text}')`,
        "click(OX:2)",
        "waitQuery(T:Type a message)",
        "sendKey(Back)"
    ]});
    if (retval == null) {
        print("Error: " + lastError());
        return false;
    }
    print(retval);
    return true;
}

>> sendSkype(device, "John", "Hello, how are you?")
{count: 7, list: [{retval: true},{retval: true},{count: 1},{retval: true},{retval: true},{retval: true},{retval: true}]}
也可以使用“function”中描述的示例来完成上述操作:
>> device.sendAai({action:"function(sendText(Hello))", sendText:[
    "newQuery(TP:textInput)",
    "setText(%1)",
"click(OX:2)",
"waitQuery(T:Type a message)"
]})
{retval: true}
>> var input = "Good morning"
>> device.sendAai({action:`sendText(${input})`})
{sendText: [{count: 1},{retval: true},{retval: true},{retval: true}]}
下面的函数会找到一个名字,点击聊天界面,使用刚刚创建的“sendText”函数发送文本,点击返回键返回主界面(如果你使用的是非 Sigma 键盘,使用两个 sendKey(Back)) .
>> device.sendAai({action:"function(findAndSend)", findAndSend:"scrollIntoView(T:%1);click;sendText(%2);sendKey(Back)"})
{retval: true}

function sendSkype(device, name, text) {
var retval = device.sendAai({action:`findAndSend(${name}, '${text}')`});
    if (retval == null) {
        print("Error: " + lastError());
        return false;
    }
    print(retval);
    return true;
}

>> sendSkype(device,"John", "Hello, how are you?");
{findAndSend: [{retval: true},{retval: true},{sendText: [{count: 1},{retval: true},{retval: true},{retval: true}]},{retval: true}]}
将其放入脚本:restartApp(skype) 或 openApp(Skype) 并调用 sendSkype() 发送消息。
示例 4: 这将打开 Samsung 计算器,获取计算器中按钮的节点 ID,从公式创建元素数组并使用“forEach”单击元素数组以获得结果。
var idList = {};
var device;

function sendAai(obj) {
    var retval = getDevice().sendAai(obj);
    if (retval == null) {
        throw "Error on: " + JSON.stringify(obj) + ":" + lastError();
    }
    print("$ " + JSON.stringify(obj) + "\n" + JSON.stringify(retval));
    return retval;
}

function init(device) {
    getDevice = () => device;
    sendAai({action:"openApp(com.sec.android.app.popupcalculator)"});
    var list = sendAai({query:"T:/^[0-9+=-]$/", action:"getNodes(T)"}).list;
    list.forEach((p) => idList[p.text+""] = p.id);
}

function calc(formula) {
    var fList = formula.split("");
    var elemList = [];
    fList.forEach((p) => elemList.push(idList[p]));
    print(elemList);
    elemList.push(idList['=']);
    sendAai({elements:elemList, action:"forEach(nsClick)"});
    return sendAai({actions:"refresh(*R:.calc_edt_formula);getText"}).list[1].retval;
}

var getDevice = () => device;
init(device);
print(calc("123+456"));

$ {"action":"openApp(com.sec.android.app.popupcalculator)"}
{"retval":true}
$ {"query":"T:/^[0-9+=-]$/","action":"getNodes(T)"}
{"count":12,"list":[{"id":"c734","text":"7"},{"id":"caf5","text":"8"},{"id":"ceb6","text":"9"},{"id":"d638","text":"4"},{"id":"d9f9","text":"5"},{"id":"ddba","text":"6"},{"id":"e53c","text":"1"},{"id":"e8fd","text":"2"},{"id":"ecbe","text":"3"},{"id":"f07f","text":"+"},{"id":"f801","text":"0"},{"id":"ff83","text":"="}]}
$ {"elements":["e53c","e8fd","ecbe","f07f","d638","d9f9","ddba","ff83"],"action":"forEach(nsClick)"}
{"retval":[{"retval":true},{"retval":true},{"retval":true},{"retval":true},{"retval":true},{"retval":true},{"retval":true},{"retval":true}]}
$ {"actions":"refresh(*R:.calc_edt_formula);getText"}
{"count":2,"list":[{"retval":true},{"retval":"579 Calculation result"}]}
579 Calculation result
示例 5: 在第一个示例中,您可以使用"T:<text>"和偏移量来点击图标,某些应用程序没有为底部导航栏提供标签:

由于这显示在最后一行,我们可以使用“TP:line,bottom,-1”返回节点,使用“IX”从节点列表中定位单个节点。例如:点击搜索图标:
device.sendAai({query:"TP:line,bottom,-1&&IX:2", action:"click"})示例 6: 在某些聊天窗口中,会显示名称(或电话号码),要获取它,使用以下查询:

>> device.sendAai({query:"TP:line,top,1&&IX:1", action:"getText"})
{retval: (999)999-9999}
要返回,点击左箭头:
>> device.sendAai({query:"TP:line,top,1&&IX:0", action:"click"})
{retval: true}
注意:新版本的“Messages”不再适用于“TP:line”,您仍然可以检索第一行或最后一行的信息,使用"VG"获取组信息和"RN"缩小到感兴趣的节点。
第一行:

>> device.sendAai({query:"TP:reduced&&IX:0&&VG&&RN&&ST:x"})
{count: 6, ids: ['1669cf','168f59','16931a','1696db','169a9c','167151']}
要获取名称:
>>  device.sendAai({query:"TP:reduced&&VG&&RN&&ST:x&&IX:1", action:"getText"})
{retval: 'Daniel'}
>> device.sendAai({query:"TP:reduced&&VG&&RN&&ST:x", action:"getText(IX:1)"})
{retval: 'Daniel'}
>> device.sendAai({query:"TP:reduced&&VG&&RN&&ST:x", action:["addQuery(IX:1)", "getText"]})
{count: 2, list: [{count: 1},{retval: 'Daniel'}]}
最后一行:

>> device.sendAai({query:"TP:reduced&&IX:-1&&VG&&RN&&ST:x"})
{count: 5, ids: ['16227c','162dbf','15db29','15deea','16570a']}
想要输入文本并点击发送按钮,请使用偏移量2来定位发送按钮:

>> device.sendAai({query:"TP:textInput", action:["setText(Hello)", "click(OX:2)"]})
{count: 2, list: [{retval: true},{retval: true}]}
示例 7: 轻松定位并点击。

要点击箭头,请使用:
>> device.sendAai({query:"T:Channels&&OX:1", action:"click"})
{retval: true}
查询示例 III
示例 1: 考虑以下杂货应用:
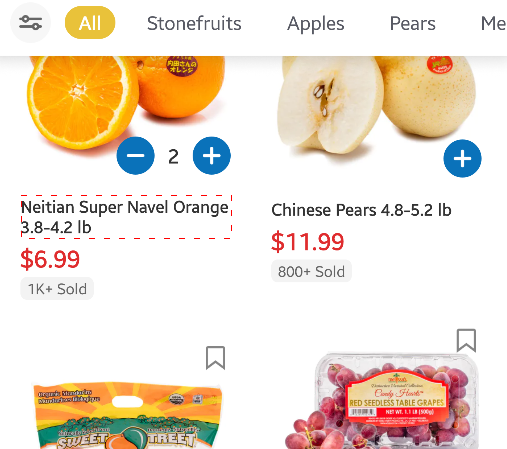
"scrollIntoView"将滚动直到找到"*Orange*",并将"Valencia Oranges …"节点存储在ML中,VG将获取ViewGroup。使用UI Explorer查找价格和"+"按钮的资源ID以添加到购物车中。"scrollIntoView"将使找到的节点完全可见,因为节点是水果的名称,因此完全可见,但图像被遮挡。添加一个"Viewgroup"将使其正常工作。
>> device.sendAai({actions:[
    "scrollIntoView(T:*Orange*)",
    "addQuery(VG)",
    "showOnScreen",
    "getText(R:.tv_price)",
    "click(R:/.iv_edit_right|.tv_num/)"
]})
{count: 5, list: [{retval: true},{count: 13},{retval: true},{retval: '$6.99'},{retval: true}]}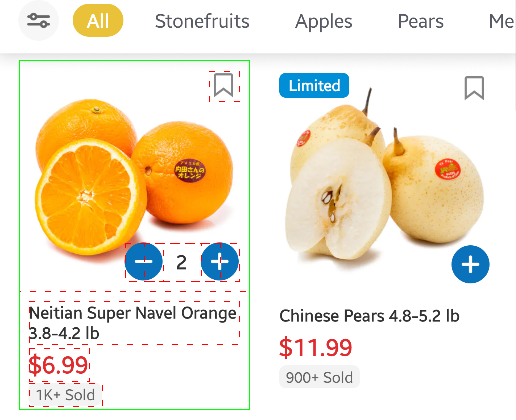
Version 14将允许"scrollIntoView"返回多个节点,更简单:
>> device.sendAai({actions:[
    "scrollIntoView(T:*Oranges*&&VG)",
    "getText(R:.tv_price)",
    "click(R:.iv_edit_right)"
]})
{count: 5, list: [{retval: true},{count: 8},{retval: true},{retval: '$6.99'},{retval: true}]}
示例 2: 使用"checked"来操作复选框。
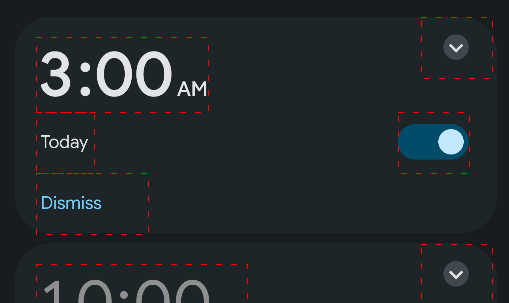
要展开详细的闹钟信息,使用"\s"来匹配不同类型的空白字符:
>> device.sendAai({query:"T:/3:00\\sAM/&&OX:1", action:"click"})
{retval: true}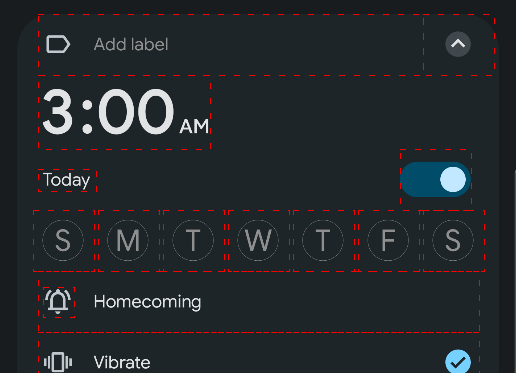
要将今天旁边的复选框从true更改为false,使用"checked",仍然需要使用"3:00 AM"作为锚点,因为屏幕上可能还有其他带有"Today"的闹钟。
>> device.sendAai({query:"T:/3:00\\sAM/&&OY:1&&OX:1", actions:["getChecked", "setChecked(false)", "getChecked"]})
{count: 3, list: [{retval: true},{changedCount: 1},{retval: false}]}
接下来:

这是从星期日到星期六的循环闹钟,例如,使用"D:Sunday"和"T:S"来表示第一个复选框。使用intersectX (TX)来获取所有被选中的复选框。在这个示例中,"C:.CheckBox"是不必要的,但作为示例很好:
>> device.sendAai({action:"getDescription(D:Sunday&&C:.CheckBox&&TX)"})
{retval: ['Sunday','Monday','Tuesday','Wednesday','Thursday','Friday','Saturday']}
要选中所有复选框,setChecked支持查询,它返回已更改的数量。
>> device.sendAai({query:"D:Sunday&&C:.CheckBox&&TX", action:"setChecked(true)"})
{changedCount: 7}
有几种方法可以关闭星期日和星期六:
>> device.sendAai({query:"D:/Sunday|Saturday/", action:"setChecked(false)"})
{changedCount: 2}
>> device.sendAai({query:"T:S", action:"setChecked(false)"})
{changedCount: 2}
要获取这些复选框的值:
>> device.sendAai({query:"D:Sunday&&C:.CheckBox&&TX", action:"getChecked"})
{retval: [false,true,true,true,true,true,false]}
示例 3: OY和OX的顺序很重要,下面是一个开发者选项之一:
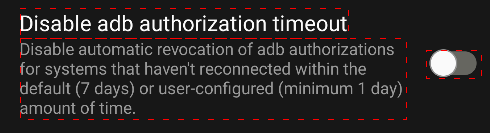
"Disable adb authorization timeout"右侧没有节点,因此在X上应用偏移将返回null:
>> device.sendAai({query:"T:Disable adb authorization*&&OX:1&&OY:1"})
null
>> lastError()
Offset out of range
如果将"OX"和"OY"的顺序颠倒,它将起作用,在X之前应用Y的偏移,将得到正确的节点:
>> device.sendAai({query:"T:Disable adb authorization*&&OY:1&&OX:1"})
{count: 1, ids: ['25c8d4']}
>> device.sendAai({query:"T:Disable adb authorization*&&OY:1&&OX:1", action:"getChecked"})
{retval: false}
>> device.sendAai({query:"T:Disable adb authorization*&&OY:1&&OX:1", actions:["setChecked(true)", "getChecked"]})
{count: 2, list: [{changedCount: 1},{retval: true}]}
将所有内容放在一起,使用"openAndroidSetting"来打开开发者选项:
>> device.sendAai({actions:[
 "openAndroidSetting(APPLICATION_DEVELOPMENT_SETTINGS)",
 "scrollIntoView(T:Disable adb authorization*)",
 "addQuery(OY:1&&OX:1)",
 "setChecked(true)",
 "sendKey(Back)"
]})
{count: 5, list: [{retval: true},{retval: true},{count: 1},{changedCount: 1},{retval: true}]}
示例 4: 将开发者选项 "Window animation scale" 更改为 "2x",需要使用"+"来匹配"T:*2x",因为它是一个新窗口,需要新的查询。
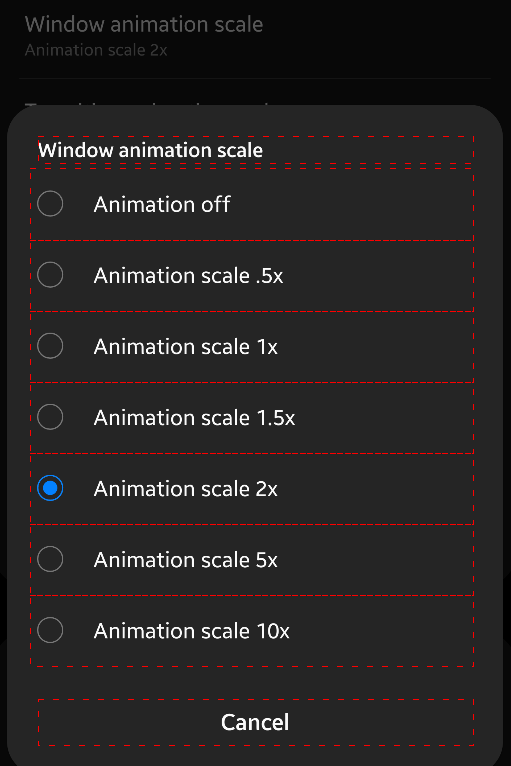
>> device.sendAai({actions:[
    "openAndroidSetting(APPLICATION_DEVELOPMENT_SETTINGS)",
    "scrollIntoView(T:Window animation scale)",
    "click",
    "click(+T:*2x)",
    "sendKey(back)"
]})
{count: 5, list: [{retval: true},{retval: true},{retval: true},{retval: true},{retval: true}]}
示例 5:获取不可滚动应用程序底部导航栏中的元素。
对于不可滚动的应用程序,"TP:line,bottom" 将返回空值,但底部导航栏的节点并不难获取:

请注意视频被图像边界包围。
您可以使用其中一个标签作为锚点(使用 "ON:last" 或 "IX:-1" 确保查询适用于预期节点(最后一个文本),以防屏幕中其他位置具有相同的文本:
>> device.sendAai({query:"T:Speed&&IX:-1&&TX", action:"getText"})
{retval: ['Speed',{},'Video','Status','Map','VPN']}
请注意,由于 "TX" 将返回没有文本/描述的图像节点,所以存在一个空节点。通过添加后置基本查询 "XT" 来匹配任意字符以将其删除:
>> device.sendAai({query:"T:Speed&&IX:-1&&TX&&XT:/./", action:"getText"})
{retval: ['Speed','Video','Status','Map','VPN']}
如果您不知道底部导航栏中的单词会怎样:
>> device.sendAai({query:"TP:anyText&&IX:-1&&TX&&XT:/./", action:"getText"})
{retval: ['Speed','Video','Status','Map','VPN']}
要点击第二个元素("Video"):
>> device.sendAai({query:"TP:anyText&&IX:-1&&TX&&XT:/./", action:"click(IX:1)"})
{retval: true}
>> device.sendAai({query:"TP:anyText&&IX:-1&&TX&&XT:/./&&IX:-1", action:"click"})
{retval: true}
获取图标很容易,只需在 "TX" 前面添加 "OY:-1":
>> device.sendAai({query:"TP:anyText&&IX:-1&&OY:-1&&TX", action:"getNodes('C,R')"})
{count: 5, list: [{class: '.ImageView', id: '21637d', resourceId: '.navigation_bar_item_icon_view'},{class: '.ImageView', id: '217dc4', resourceId: '.navigation_bar_item_icon_view'},{class: '.ImageView', id: '21980b', resourceId: '.navigation_bar_item_icon_view'},{class: '.ImageView', id: '21b252', resourceId: '.navigation_bar_item_icon_view'},{class: '.ImageView', id: '21cc99', resourceId: '.navigation_bar_item_icon_view'}]}
如果只想点击 VPN 顶部的图标,请使用 OQ:
>> device.sendAai({action:"click(T:VPN&&IX:-1&&OY:-1)"})
{retval: true}
示例 6:编写函数返回 SolarEdge 产品:

要获取今天的产量:
>> device.sendAai({query:"T:Production Today&&OY:1", actions:["getText", "getText(OX:1)"]})
{count: 2, list: [{retval: '38.3'},{retval: 'kWh'}]}
要获取太阳能发电量:
>> device.sendAai({query:"T:*Solar Power Now", action:"getText"})
{retval: '1.17 kW
Solar Power Now'}
>> var production = device.sendAai({query:"T:*Solar Power Now", action:"getText"}).retval.split("\n",1)
1.17 kW
JavaScript 代码获取 SolarEdge 的太阳能产量:
function sendAai(device, obj) {
    var retval = device.sendAai(obj);
    if (retval == null) {
        throw "Error on: " + JSON.stringify(obj) + ":" + lastError();
    }
    print(">>" + JSON.stringify(obj) + "\n" + JSON.stringify(retval));
    return retval;
}

function getSolarProduction(device) {
    var retval = sendAai(device, {actions:[
        "openApp(mySolarEdge)",
        "waitQuery(T:Lifetime,20000)",
        "newQuery(R:.pv_power_now)",
        "getText",
        "sendKey(Back)",
        "sendKey(Back)"]});
    var prodStr = retval.list[3].retval;
    var groups = prodStr.match(/(\d+(\.\d+)?) (W|kW)/);
    if (groups == null) {
        throw "Cannot find pattern in mySolarEdge";
    }
    var unit = groups.splice(-1);
    var number = groups[1];
    if (unit == "kW") {
        number = number * 1000;
    } else if (unit != "W") {
        throw "Unknown unit: " + unit;
    }
    return number;
}

>> getSolarProduction(device)
>> {"actions":["openApp(mySolarEdge)","waitQuery(T:Lifetime,20000)","newQuery(R:.pv_power_now)","getText","sendKey(Back)","sendKey(Back)"]}
{"count":6,"list":[{"retval":true},{"retval":true},{"count":1},{"retval":"1.17 kW\nSolar Power Now"},{"retval":false},{"retval":true}]}
1170
从 FindNode 用户指南中剪切粘贴:
从 mySolarEdge 应用程序获取 SolarEdge 产品:
>> device.sendAai({actions:"function(getProduction)", getProduction:[
    "openApp(mySolarEdge)",
    "waitQuery(T:Lifetime,20000)",
    "newQuery(R:.pv_power_now)",
    "getText",
    "sendKey(Back)",
    "sendKey(Back)"]});
{retval: true}
>> var info = device.sendAai({action:"getProduction"})
{getProduction: [{retval: true},{retval: true},{count: 1},{retval: '5.89 kW
Solar Power Now'},{retval: false},{retval: true}]}
示例 7:此示例从 SolarEdge 获取太阳能发电量并更改 Tesla 中的充电电流。 目标是通过太阳能发电而不是电网为特斯拉充电。 它将每隔 10 分钟检查一次。 运行它:
- 您需要下载并安装 Total Control 9.0(更新40)Beta 3 或官方版本。
- 您需要安装专业版,如果安装了精简版,您有一次免费尝试专业版 3 天的机会。
- 复制以下脚本并粘贴到一个文件中,假设文件路径为 "/tmp/charging.js"。
- 修改 "settings" 中的数值。
- 打开脚本终端,并输入 sigmaLoad('/tmp/charging.js')。脚本将打开 mySolarEdge,获取产量,根据 settings 中的数值计算电流,并在 Tesla 应用程序中设置正确的电流。
- 创建一个空文件(或任何文件),假设文件名为 "/tmp/Afile"。
- 在命令提示符中切换到 "/tmp" 目录,执行 "copy Afile CheckNow" 以再次检查太阳能产量(否则将等待 settings.waitInterval 分钟)。执行 "copy Afile StopNow" 以停止脚本执行。
/*

这是一个示例,它会检查SolarEdge应用程序中的太阳能产量并调整特斯拉的充电电流,
当产量(减去保留量)低于"minAmp"或达到非零的retriesBeforeStop时,它将停止充电。
其思想是使用太阳能充电特斯拉,而不是使用电网电能。

版本:0.1

*/

var controls = {};
var settings = {
  // 每安培的电压
  voltagePerAmp: 245,
  // 低于此电流时,如果达到retriesBeforeStop则退出
  minAmp: 6,
  // 特斯拉可接受的最大电流
  maxAmp: 32,
  // 用于其他用途的保留瓦数
  reserve: 500,
  // 每隔x分钟检查一次
  waitInterval: 10,
  // 停止之前的失败重试次数,零表示不停止
  retriesBeforeStop: 0,
  // 在退出前的零数(例如日落)
  retriesOnZero: 3,
  // 错误重启次数
  retriesRestart: 3,
  // 显示交互
  display: true
}

function padZero(str, length) {
    length = length || 2;
    return str.toString().padStart(length, '0');
}

function getLocalDateTimeWithAmPm() {
    const now = new Date();
    const hours = now.getHours();
    const amPm = hours >= 12 ? 'PM' : 'AM';
    const hours12 = hours % 12 || 12;
    return now.getFullYear() + '-' + padZero(now.getMonth() + 1) + '-' + padZero(now.getDate()) + ' ' +
        padZero(hours12) + ':' + padZero(now.getMinutes()) + ":" +
        padZero(now.getSeconds()) + ' ' + amPm;

}

function xprint(msg) {
    print(getLocalDateTimeWithAmPm(new Date()) + " : " + msg);
}

const fileExists = require('fs').exists;
const removeFile = require('fs').remove;
function xsleep(sleepTime) {
    const sleepInterval = 1000;
    var curTime = 0;
    while (curTime < sleepTime) {
        sleep(sleepInterval);
        curTime += sleepInterval;
        if (fileExists('/tmp/StopNow')) {
            removeFile('/tmp/StopNow')
            exitNow(0,"用户停止");
        }
        if (fileExists('/tmp/CheckNow')) {
            removeFile('/tmp/CheckNow');
            return;
        }
    }
}

function sendAai(obj, ignoreError) {
  ignoreError = ignoreError || false;
  var retval = getDevice().sendAai(obj);
  if (retval == null) {
    errorStr = '错误发生在: ' + JSON.stringify(obj) + ':' + lastError();
    if (ignoreError) {
      xprint('>> ' + errorStr + '. 已忽略');
      return null;
    }
        throw new Error(errorStr);
    }
    if (settings.display) {
        xprint(">>" + JSON.stringify(obj) + "\n" + JSON.stringify(retval));
    }
    return retval;
}

function setCharging(newState) {
    openTesla();
    const pat = "(Start|Stop) Charging";
    const retval = sendAai({action:`newQuery('T:/${pat}/', 2000);getIds;getText`}, true);
    if (retval == null) {
        throw new Error("无法获取充电状态模式");
    }
    const id = retval.list[1].ids[0];
    const chargingString = retval.list[2].retval;
    const regExp = new RegExp(pat);
    const groups = chargingString.match(regExp);
    if (groups == null) {
        throw new Error("无效的充电字符串");
    }
    // 行动是相反的,"Start Charging" 意味着当前未充电。
    const curState = groups[1] == "Start" ? false : true;
    if (curState == newState) {
        return;
    }
    sendAai({elements:[id], action:"click"});
    const text = (newState ? "Start" : "Stop") + " Charging";
    return sendAai({action:`waitQuery(T:${text}, 3000)`}, true) != null;
}

var lastErrorMsg = "";
function setError(msg) {
    lastErrorMsg = msg;
}

function getError() {
    return lastErrorMsg;
}

function getSolarProduction() {
    const retval = sendAai({actions:[
        "openApp(mySolarEdge)",
        "waitQuery(T:Lifetime,25000)",
        "newQuery(R:.pv_power_now)",
        "getText",
        "sendKey(Back)",
        "sendKey(Back)"]});
    // getText
    const prodStr = retval.list[3].retval;
    const groups = prodStr.match(/^(\d+(\.?\d+)?) (W|kW)/);
    if (groups == null) {
        setError("在 mySolarEdge 中找不到匹配模式");
        return -1;
    }
    const unit = groups.splice(-1);
    var number = groups[1];
    if (unit == "kW") {
        number = number * 1000;
    } else if (unit != "W") {
        setError("未知单位: " + unit);
        return -1;
    }
    return Math.round(number);
}

function startCharging() {
    return setCharging(true);
}

// 有时停止充电会在第二次或第三次点击时生效
function stopCharging() {
    return setCharging(false);
}

function adjAmp(num) {
    openTesla();
    var ctrl;
    var count;
    // 有时 “<” 或 “>” 无法完全识别,运行多次以确保数字匹配
    for (var i = 0; i < 5; ++i) {
        var amp = sendAai({elements:[controls.amp], action:"getText"}).retval.split(" ")[0];
        if (amp == num) {
            return true;
        } else if (amp > num) {
            ctrl = controls.less;
            count = amp - num;
        } else {
            ctrl = controls.more;
            num = Math.min(settings.maxAmp, num);
            count = num - amp;
        }
        sendAai({elements:[ctrl], action:`repeat(${count},clickWait)`});
    }
}

function init() {
    // 可能需要 20-30 秒来显示充电信息
    var success = sendAai({action:"restartApp(Tesla, 'T:/(Start|Stop) Charging/', 30000)"}, true);
    if (success == null) {
        exitNow(2, "找不到充电信息,请确保应用处于充电模式");
    }
    var retval = sendAai({query:"T:/[0-9]+ A/&&TX"});
    if (retval.count != 3) {
        exitNow(3, "找不到控件");
    }
    controls.less = retval.ids[0];
    controls.more = retval.ids[2];
    controls.amp = retval.ids[1];
    var solarProd = getSolarProduction();
    if (solarProd == -1) {
        exitNow(4, "无法获取太阳能发电量: " + getError());
    }
    // 创建一个函数“clickWait”
    sendAai({action:"function(clickWait)", clickWait:["sleep(200)", "nsClick"]});
    return true;
}

function start() {
    var retriesCounter = 0;
    var retriesOnZero = 0;
    while (true) {
        var solarProd = getSolarProduction();
        if (solarProd == -1) {
            throw new Error("无法获取太阳能发电量");
        }
        if (solarProd == 0 && settings.retriesOnZero != 0) {
            retriesOnZero++;
            if (retriesOnZero >= settings.retriesOnZero) {
                exitNow(1, "零发电量");
            }
        }
        // .7 或以上将会进位到下一个整数
        var amp = Math.floor((solarProd - settings.reserve)/settings.voltagePerAmp + 0.3);
        amp = Math.min(amp, settings.maxAmp);
        amp = amp < 0 ? 0 : amp;
       xprint('收到太阳能发电量:' + solarProd + ' 瓦特,调整为 ' + amp + ' 安培');
        if (amp < settings.minAmp) {
            retriesCounter++;
            if (retriesCounter < settings.retriesBeforeStop || settings.retriesBeforeStop == 0) {
                stopCharging();
                xprint('电流太低,' + amp + ' A。重试下一个间隔。等待中...');
            }
        } else {
            startCharging();
            retriesCounter = 0;
            adjAmp(amp);
        }
        xsleep(settings.waitInterval*60*1000);
    }
}

function exitNow(code, msg) {
    xprint(msg);
    xprint("退出代码: " + code);
    // 最后尝试停止充电
    try {stopCharging()} catch (e) {};
    exit(code);
}

if (device == null) {
    throw new Error("未连接任何设备");
}

const getDevice = () => device;
const openTesla = () => sendAai({action:"openApp(Tesla);sleep(300)"});

var retriesRestart = 0;
while(true) {
    try {
        init();
        start();
    } catch (e) {
        bypassExit(e);
        retriesRestart++;
        if (retriesRestart >= settings.retriesRestart) break;
        xprint("发生错误: " + e);
        xprint("重新启动脚本");
    }
}